Dairy farmers are the original engineers, finding creative solutions to solving common and not-so-common problems on the farm. Take a look at our library of farmer-made ideas submitted by real dairy farmers in Pennsylvania and beyond! Whether it’s choosing the welder over an expensive repair bill or figuring out how to track data on your own to avoid another monthly subscription fee, these ideas can help you find homemade remedies to create cost-savings, improve your processes, and keep moving forward.
Have an idea that you want to share? In November of 2026, we will once again open our “Farmer-Made Ingenuity Contest.” Submit your best farmer-made idea(s) for a chance to win a cash prize! Stay tuned.
View Our Library of Ideas
Click on each photo to read WHAT the farmer created, learn the background on WHY they developed the solution, see HOW it helped. The ideas marked with first, second, and third place represent the winners of the 2025 contest.
Solution for Water Waste

Submitted by Lauren Smoker, Hollo Home Farms LLC
WHAT did you create?
We feed our calves with a milk taxi, so we needed a way to cool the milk without all the water waste. We run the warm water that comes out of the pasteurizer into the wash sink. We then use the water to clean the pasteurizer and wash it off after feeding the calves.
WHY did you create it?
We chose to do this because it cut back on water waste. During summers we have to be careful on how much water we use. We want to save water for more important things such as clean drinking water for the cows and water to wash our milking system.
HOW did it help?
It helped majorly by reusing and cuts back time for the person feeding calves by not waiting on water to fill up in buckets. It also saves a lot of water to be used in other areas on the farm.
Silage Bucket & Defacer Built Into One
Submitted by Donny Bartch, Merrimart Farms
WHAT did you create?
We combined 2 pieces of equipment into one. We took a silage bucket and mounted a silage defacer on top of it.
WHY did you create it?
We wanted to maintain the quality of the silage face with the defacer without having to hook and unhook hydraulic hoses and buckets all the time. This made both jobs of defacing the silage and loading the feeder wagon easier and more efficient. We also noticed the right amount of silage is defaced every feeding because you do not have to switch back and forth.
HOW did it help?
It created a way to not have an excuse to deface the silage face no matter how much or little you needed. No more bucking into face with a bucket for 500 more pounds or having 500 extra pounds laying on the concrete until the next feeding. No matter if it’s raining, snowing or even extremely hot, you can stay in the cab to deface and load all the silage needed. It makes feeding the cows easier and helps make sure the job is done right.
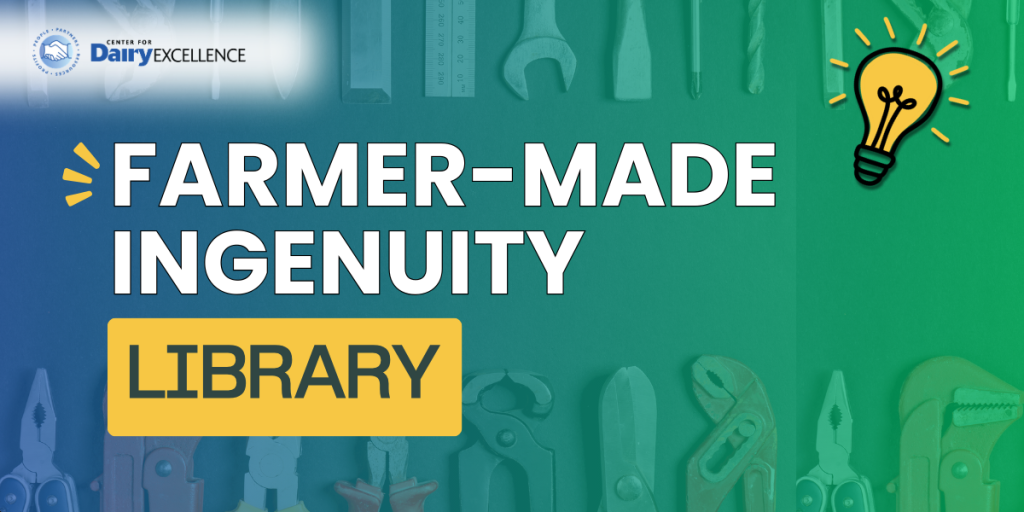
Hay & Grain Feeder for Animals on Pasture
Submitted by Aaron Breneman, Franklin View Farms
WHAT did you create?
A hay and grain feeder for small animals on pasture out of a used chemical tote. We use these for our weaned beef calves and goats. There’s a hay feed on top with a cover to keep it dry and a tray in the bottom for grain. These are easy to make, inexpensive and work really well!
WHY did you create it?
We always need hay feeders for animals on pasture. We’ve bought expensive metal racks in the past that didn’t quite fit our needs. These were inexpensive and we could have multiple of them in different pastures.
HOW did it help?
This has really helped our son and daughter with their show calves. They are easy to access for little ones and our son can easily put hay and grain into these himself without assistance. It helps him gain some responsibility and confidence knowing he can feed his animals himself.
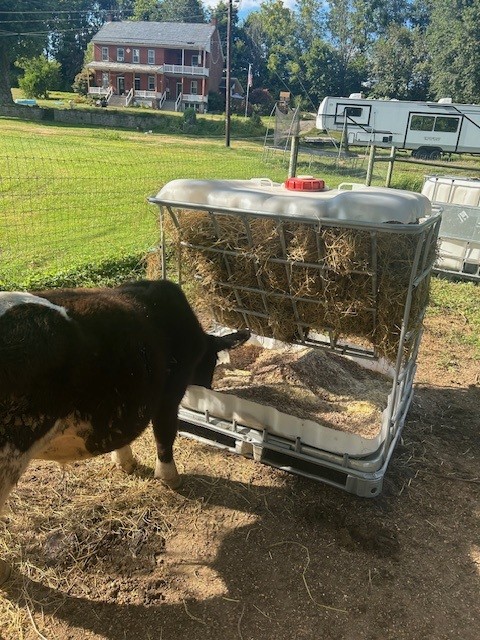
Solution for Flushing Gutters & Utilizing Manure
Submitted by Darlene Welch, Welch Farm
WHAT did you create?
In 1992, we put an addition on our original barn and created a way of flushing the gutters with waste water from the milk house cleaning pipe line and bulk tank. We used 18″ PVC pipe buried underground from the barn to an old bulk tank for holding tank from which the manure slid down to the manure lagoon. The gutters behind the cows were dug in on a 4-8% grade to flow into the holding tank beneath the barn. PVC holding tanks are on each end of the barn to pump the water into from the cistern that collected the waste water. A stand pipe is pulled up on each one to release the water when it is full to flow into the gutters behind the cows. The gutters are 18″ PVC pipe cut in half and laid in the bottom and then cement poured to frame up to the barn floor and grating put over the top.
WHY did you create it?
We wanted to have a system that didn’t use the conventional barn cleaners and all the upkeep to them. And we wanted to spread manure on the fields when it was more valuable to the soil in the spring rather than on frozen, snowy ground.
HOW did it help?
This method of utilizing the manure has made it possible for us to not use any commercial fertilizer. We do use chicken manure as an additional source of fertilization. We have a traveling irrigator that we use to pump via a trash pump the liquid portion off in the spring when fields are too wet to run a large truck on. Then the more solid portion is spread on with a truck later.
Calf Hutch Accessory to Keep Calves Warm in Winter
Submitted by Mary Creek, Palmyra Farm
WHAT did you create?
We created an accessory to use on our calf hutches to help protect newborn calves in winter months. We used a piece of plywood approximately 30 inches by 30 inches. We use it to cover the opening in our calf hutches to keep calves warmer until they are ready to face the winter temps but allow reasonable ventilation. To fasten it to the hutch we drilled 4 small holes so that we could insert two zip ties through them to hold one of the metal poles used to keep the wire hutch fences in place. The holes are about 12 inches in from either side and one about two inches above the other. We put the board inside the hutch, slide the pole through the zip tie on the outside, and it is held in place. The sizing allows air to move through the hutch but reduces the exposure for the first few days of the calf’s life. When temperatures allow, we take it out during the day and replace it at night until the calf is ready to experience the cold. It keeps calves body temps up and allows them to put more nutrition toward growth.
WHY did you create it?
We created it somewhat by accident. We had a preemie calf in the cold winter months and were worried about keeping it warm. We worried it would lose too much body heat and make it more difficult for it to thrive in a regular open front hutch. We knew it needed more protection than just a calf jacket, but yet we did not want to restrict all ventilation by completely covering the opening. So, we looked around and found the sheet of plywood that could be crafted to fit and still allow air to circulate. Then we brainstormed how to keep it in place so it would not fall in or out. We came up with the zip tie idea and it worked beautifully. We have used it multiple times and have more than one. It is easy to move to get in and out of the hutch to work with the calf. In warmer months, it is easy to store. Also, it is economical and simple to craft for even the most mechanically challenged.
HOW did it help?
It made our challenged calves more comfortable and healthier. It keeps them warm and cozy early in their lives and promotes healthy growth so our babies can use more of their ration for growth and less for maintaining body heat. It is simple, easy to construct, move and store. It saved calves!
Homemade Bale Opener
Submitted by Susan Spadaro, Love Haven Farm
WHAT did you create?
I created a simple bale opener that makes cutting baler twine quick and easy. The tool is made from a small wooden handle with an old haybine section screwed to it. This design allows you to strike the baler twine, and the sharp edge slices it cleanly without needing a knife.
WHY did you create it?
When I was a kid starting to show dairy cattle at our local fair, I struggled to open hay and straw bales because I was too young to carry a knife. My dad came up with this clever solution so I could manage the job safely and independently. Years later, as a mom, I’ve watched both of my children use that same tool throughout their 4-H careers. Fellow young kids—both from my childhood and my children’s days—have always come asking to borrow the handy tool. It’s become more than just a practical fix—it’s a piece of family history that connects generations through hard work, creativity, and tradition.
HOW did it help?
This simple bale opener has saved time and frustration for years. It eliminated the need for young kids to carry knives, making the process safer and easier. When I was showing cattle, it gave me independence—I could open bales on my own without waiting for help. Later, my children used the same tool throughout their 4-H careers, and it became a go-to item for other kids as well. Fellow exhibitors often came asking to borrow it because it worked so well. What started as a quick fix has turned into a trusted, multi-generational tool that continues to make daily chores more efficient and safe.
When I was a child, other dads saw what my dad had made for me and eventually built similar tools for their own kids. Over the years, this simple idea spread among families at the fair. But to this day, my showbox is the only one still carrying the original tool—passed down from me to my children and now continuing from one generation to the next. It’s more than just a bale opener; it’s a symbol of resourcefulness, tradition, and family pride.
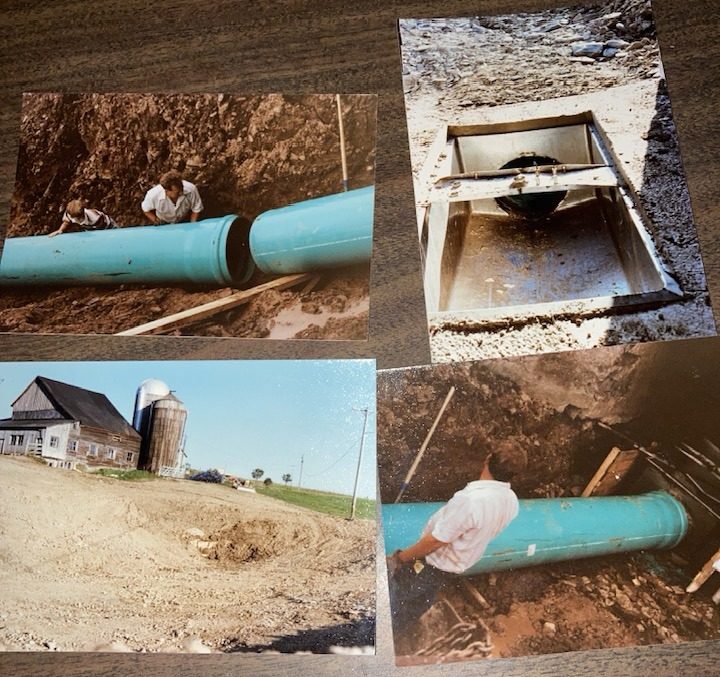
Automatic Fill, Heated Waterer
Submitted by Gregory Knutsen, G&S Dairy
WHAT did you create?
We created an automatic fill, heated waterer for around $100 each vs over $500 for a typical frost-free waterer. We partially buried a 50 gal drum in the ground and ran the water and electric into it. A 16 gallon electric heated horse waterer fits into the top and gets pugged in underneath. To make the waterer auto fill, we cut through the bottom and inserted an anti siphon toilet valve. Current price for the heated waterers are $90 and the toilet valves are $15 for a grand total of $105. The heat from the bucket keeps the pipes from freezing in the drum.
WHY did you create it?
When we started our dairy about 20 years ago and needed about 10 or so frost-free automatic waterers for our barns and pastures and then realized how pricey they were, we realized the need for some ingenuity. Those waterers were over $500 each, and money was running low. We needed a lower cost solution!
HOW did it help?
With starting a dairy, expenses were high and cash was running low by the time it came to install the pasture and barn waterers. With a need for 10+, we needed a lower cost solution to the typical frost-free automatic waterers. When we exhausted our search, we decided the only solution was to get creative and build something on our own. These waterers were built for around $100 each and 20 years later they are still working great. They allow us virtually maintenance-free watering even in the freezing winter temps.
Spreadsheet to Track Bulk Tank Milk, Components, and SSC
Submitted by Kevin Breckbill, Breckbill Acres LLC
WHAT did you create?
Spreadsheet to track bulk tank milk, components, and SSC for our milking cows.
WHY did you create it?
I was looking for a continual way to track our herd production, pounds of components, and SSC and this spreadsheet is a great way to do that.
HOW did it help?
Having a continual record has been helpful with seasonal fluctuations, feed changes and other things that impact the herd production and SSC.
Milk Cooling Solution That Fills Two Bulk Tanks at Once
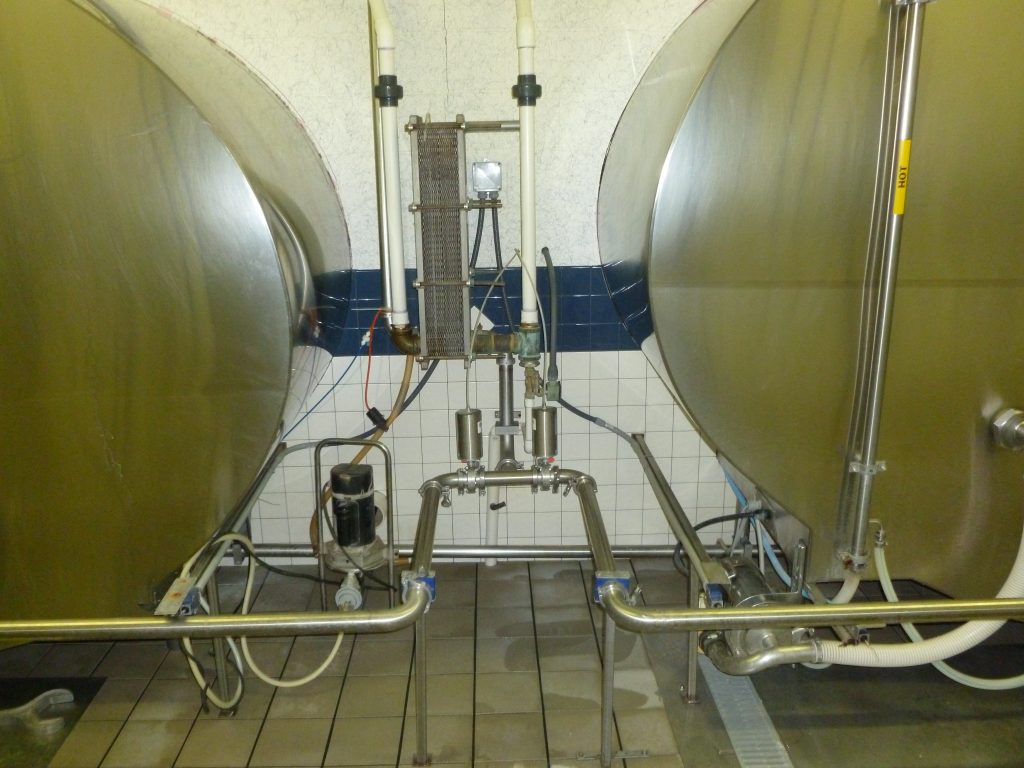
Submitted by Ben Mullen, Good View Farm LLC
WHAT did you create?
Created a way to fill 2 bulk tanks at once, utilizing 5 compressors or cooling units at once instead of 2 or 3 on a single tank.
WHY did you create it?
Could not cool milk fast enough, caused high bacteria counts.
HOW did it help?
Milk is cooled consistently faster, taking half the time to cool by filling 2 bulk tanks at once. This eliminated the need to switch tanks during the first milking after tank pickup.
Express Wagon for Calf Feeding with Variable Speed Pump
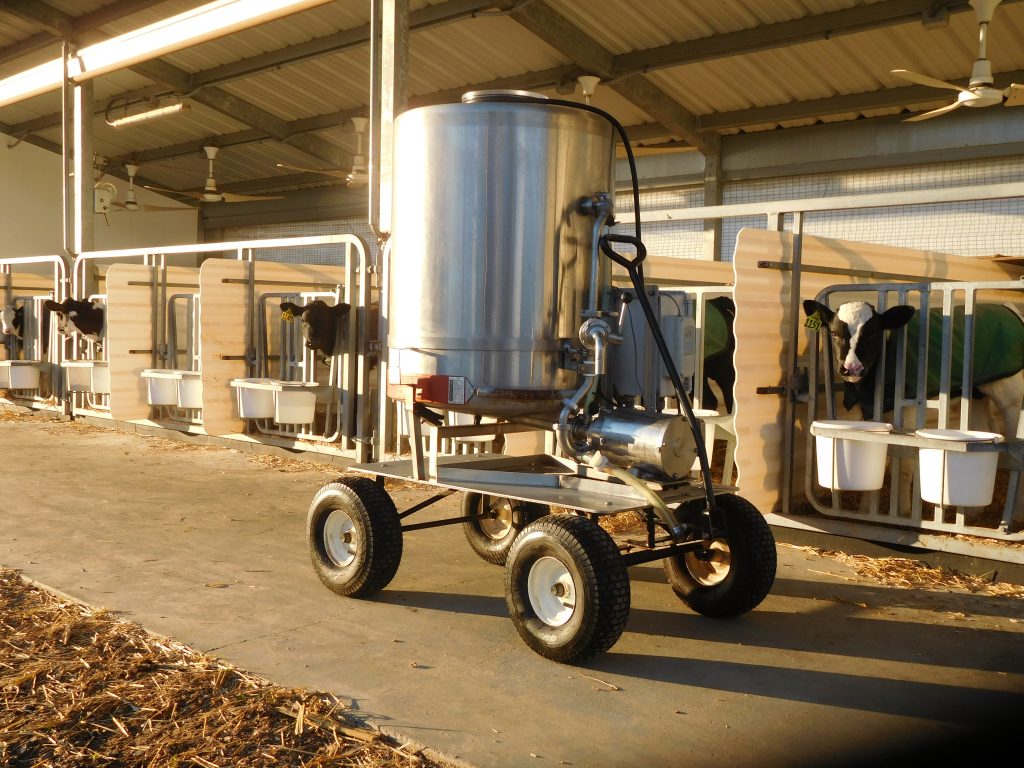
Submitted by Laray Zimmerman, Weafrog Holsteins LLC
WHAT did you create?
Calf milk taxi on an express wagon frame. It has a variable speed pump for pump-out and in-tank agitation. The barrel heatstrap on the outside is the heat source to warm up the milk.
WHY did you create it?
I created it help us feed calves faster. I was tired of mixing milk individually for each calf. With the milk taxi we can mix 1 batch and disperse to each individual calf.
HOW did it help?
It has helped reduce the labor needed to feed calves. It was a trial and error project for us. We probably will be making some modifications in the near future.
Milk Taxi to Feed Calves 3 Miles From Main Milking Center
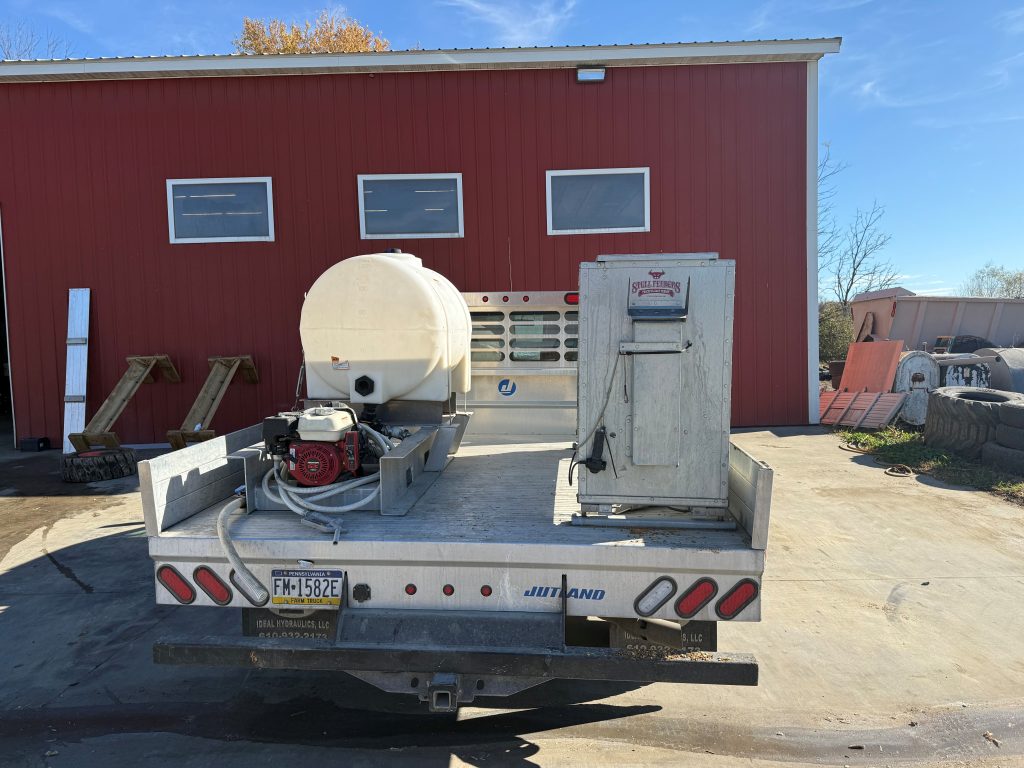
Submitted by Walt Moore, Walmoore Holsteins
WHAT did you create?
We call it our “Milk Taxi.” Our baby calves are housed approximately 3 miles from our main milking center. They are housed in group pens of 10 and are fed acidified milk, then grain and hay as they age. So we needed a inexpensive, simple solution to transport the milk and grain from our dairy to the calf facility. So we bought a used F450 truck and mounted a 150 gallon poly tank on it, bought a gas powered pump and the fittings from a local hardware store, and plumbed up a tank and pump system using a gasoline hose nozzle to dispense the milk. We also bought a 12 volt “grain feeder” from Stull feeders and mounted it on the same truck. This allows our youngstock technician to have the milk and grain all in one mobile place and saves a ton of hauling milk and grain with 5 gallon buckets! The grain feeder is mounted on a scale so we can accurately dispense the amount of grain we want to feed to each group.
WHY did you create it?
To cut down mixing and transporting acidified milk in 5 gallon buckets. It also helped us cut down hauling grain in 5 gallon buckets. We created it for efficiency of labor and more accurate/consistent acidification of the milk.
HOW did it help?
We created it for efficiency of labor and more accurate/consistent acidification of the milk. It reduced the feeding/mixing/cleaning time by nearly 50%!